| I adore a room trimmed in grosgrain ribbon and nail heads. When Traci Zeller and I first started batting around ideas for ourAdamsleigh show house room, it was amazing how many of the ideas we came up with simultaneously. We were so simpatico during the entire process. Once of the details we agreed upon early on was the addition of grosgrain ribbon and nail heads to trim our gentlemen’s dressing room and bath. We decided we wanted to only trim the doorways, baseboards and the ceiling. We took swift measurements and rounded up all the emerald green grosgrain we could find. We went online to find a tutorial about how to tackle this project, but there were none to be find. I did find one blogger who had attached ribbon to her nursery wall using Ailene’s Original Tacky Glue, so off I went to Michael’s to find this product. Every project is different you are the only one who can decide what size ribbon and nail heads look best for your product. We decided to go with ribbon that was 1″ wide and 1″ nailheads in french natural finish from D’Kei. I think it is fair to say you could use 5/8″ and 5/8″ nail heads, but probably not smaller unless you are going for that French upholstery look. |
As you can see from the photograph, the first thing we did glue the ribbon down
where we wanted it around the room
We used painters blue tape to hold the ribbon in place while the glue was drying.
Here is our ceiling before we added the ribbon and trim.
Finished edges
we used 1″ ribbon and 1″ nail heads which are both large themselves for a small room.
If you want nail heads close together, then your best bet might be to buy a chain of nail heads like the one above which only has a real nail head to be hammer every 5th
nail head. Once it is properly attached, it looks as though you hammered each one separately!
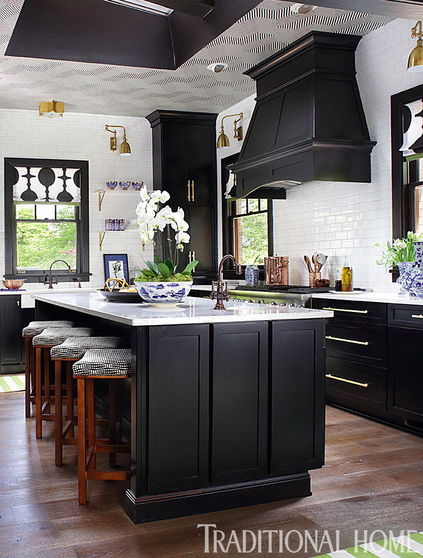
Here is a picture of an application that may have used the continual string of nail heads.
It’s great for trimming out things like picture frames, cabinets, etc.
Would probably be great for doors as well, but I’m betting Miles Redd had each one of
these babies hand attached.
_________________________
Supplies Needed For Grosgrain/Nail head Trim
1 rubber mallet
Nail head spacer if the distance works for your project if not make your own like we did
with a piece of cardboard
Ailene’s Original Super Tacky Glue (get a couple of these if you are doing an entire room)
Nail heads 1/2″, 5/8″ or 1″ depending on the look you want
Ribbon – Again you can use ribbon 1/2″ -1″ but 1″ gives you a bigger bang for your buck
Blue painter’s tape to hold ribbon while drying
Sponge brush to brush the glue onto the ribbon back
Tips:
-Start on the least noticeable corner of the room and work your way around the room.
Typically that is the corner behind you when you enter a room.
-Measure your areas and cut your ribbon prior to starting, it makes it so much easier.
-Make sure you leave about 1/2′” – 1″ for turning under so you have a clean edge on the ends when you finish.
-Be consistent about which ribbon goes on top when going around door frames. Start and end the same way. In other words, if you start on one side of the door with the vertical ribbon on top of the baseboard ribbon then end the same way on the other side of the door. If you don’t your eye will notice it and it will look inconsistent.
-Use Petersham ribbon when possible. You will have to order online but it is more pliable and great for curved areas. It’s a little more refined looking than grosgrain.
-Dont’ use a hammer unless you want dented nail heads, always use a rubber mallet
____________________________
Send me a link if you decide to tackle a nail head project! I would love to see what you make. If you want you can follow my nail head board on Pinterest here!
If you live in Charlotte,NC or the surrounding area and need a good installer, Mike is the best! He hangs art, installs window treatments, nail head trim, etc. I think he can do just about anything. Email me if you want his number! lisa@lisamende.com
Have Fun!!!!


 By
By